Capturing the moon with an iPhone might sound like a cosmic challenge, but it’s easier than you think. Imagine impressing your friends with stunning lunar shots that leave them wondering if you’ve magically become a professional astrophotographer. Spoiler alert: you don’t need a fancy camera or a degree in astronomy—just your trusty iPhone and a few simple tips.
Whether you’re aiming for a close-up of the craters or a dreamy shot of the moonlit sky, understanding how to harness your device’s capabilities can turn your nighttime stroll into a celestial photography adventure. Get ready to unleash your inner photographer and take your moon shots from “meh” to magnificent. After all, who wouldn’t want to show off their own piece of the universe?
Understanding Moon Photography
Capturing the moon’s beauty through an iPhone requires specific techniques and considerations. Recognizing key factors makes stunning lunar photography achievable.
The Importance of Equipment
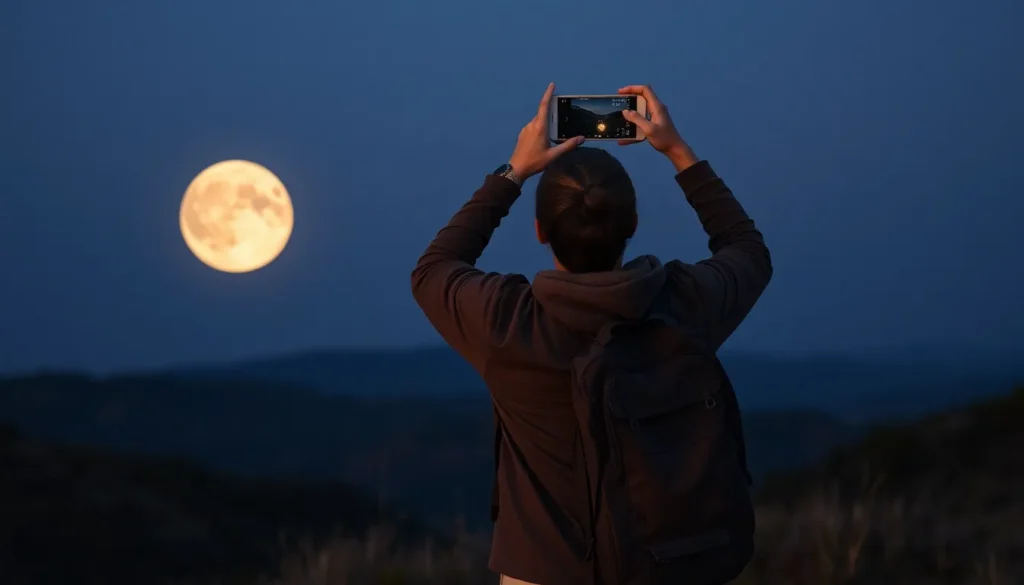
An iPhone serves as a powerful tool for capturing moon images. Its built-in camera technology offers impressive capabilities that can yield excellent results. Using a tripod stabilizes the phone, preventing camera shake during longer exposures. Additional lenses designed for mobile devices enhance detail and clarity. Taking advantage of editing apps allows for post-processing adjustments that can refine final images. Key equipment can elevate moon photography beyond simple snapshots. Therefore, ensuring adequate gear enhances the captured details significantly.
Choosing the Right Time
Timing plays a crucial role in moon photography. The best results often come when the moon appears large and low on the horizon, creating a striking perspective. Photographers should also consider the phase of the moon; full moons produce bright images, while crescent or half moons highlight surface features. Early evening or just before dawn offers advantageous lighting conditions, providing a clear view against a darker sky. Clouds can obscure details, so checking weather forecasts helps in selecting ideal shooting moments. Optimal timing influences both the quality and the composition of moon photographs.
Setting Up Your iPhone
Setting up an iPhone for moon photography requires thoughtful consideration of camera settings and stabilization methods. The right adjustments lead to clearer and more captivating images.
Adjusting Camera Settings
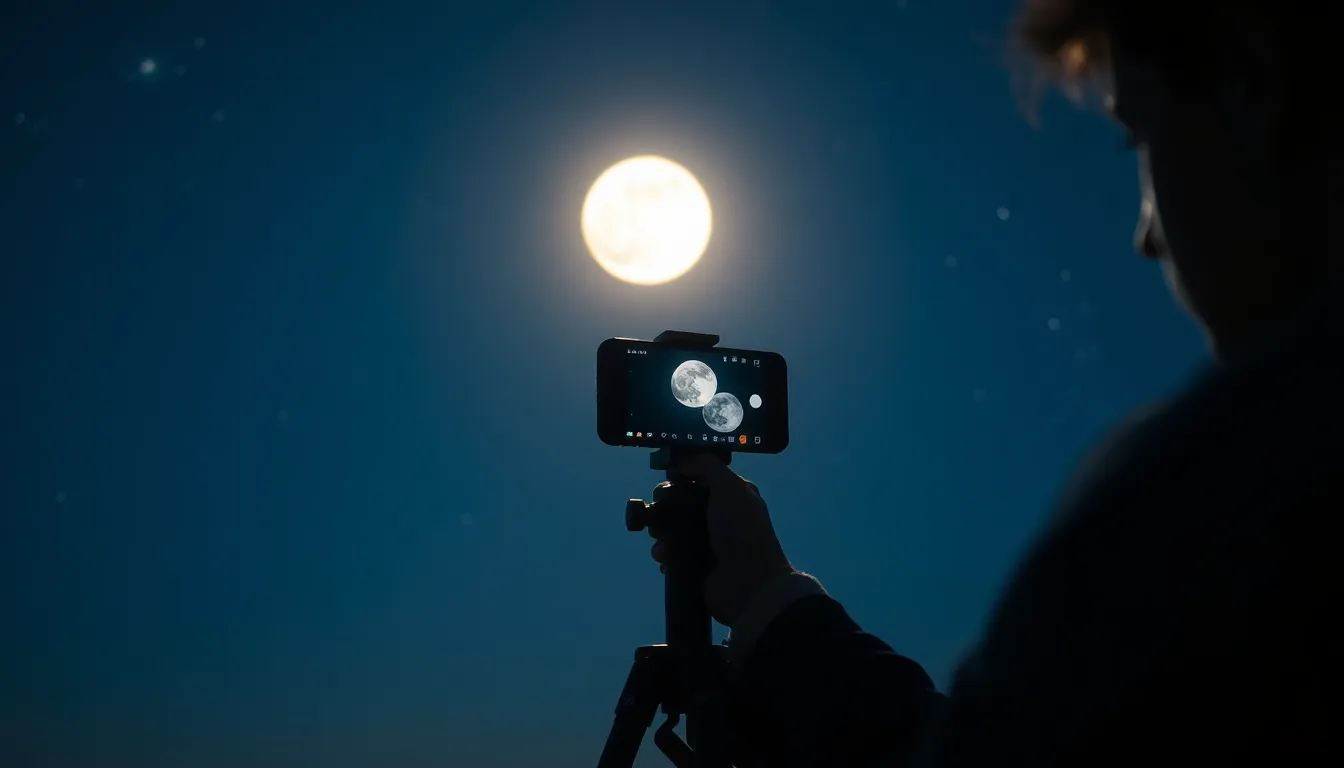
Optimizing camera settings enhances moon photography outcomes. First, open the Camera app and switch to Night mode for improved low-light performance. Next, increase the exposure time using the exposure slider, which allows more light to reach the sensor. Turn off flash, as artificial light can distort lunar details. Additionally, experiment with the HDR function to balance highlights and shadows without overexposing bright areas. Lastly, consider using the grid option in settings for better composition. These tweaks create a foundation for stunning moon shots.
Using Tripods and Stabilizers
Utilizing tripods and stabilizers is crucial for sharp moon photographs. Tripods provide stability, preventing unwanted movement during long exposure times. Choose a sturdy tripod that can withstand wind and adjust to varying heights. For added support, use a stabilizer or gimbal, which counteracts any minor shakes. Placing the iPhone securely in the holder is essential for clear images. Assess different angles and heights to capture unique perspectives. By incorporating these tools, the quality of moon photography improves significantly, yielding more professional-looking results.
Techniques for Capturing the Moon
Photographing the moon using an iPhone involves specific techniques to enhance image quality and composition. Understanding these techniques can lead to more stunning lunar photography.
Utilizing Zoom and Focus
First, utilize the iPhone’s zoom feature effectively. Digital zoom can decrease image quality, so try to maintain a limited zoom level. Instead, consider getting closer to the subject if possible. Focus on the moon by tapping on the screen, ensuring it’s sharp and clear. Experiment with the exposure slider after focusing. Lowering exposure can help prevent the moon from appearing overexposed. Check the details in the lunar surface for clearer shots. With practice, users can capture detailed craters and features that enhance the overall image.
Composition Tips for Moon Photography
Successful moon photography relies heavily on composition. Centering the moon in the frame often makes for a classic shot, but off-center placements add interest. Use the rule of thirds to position the moon artistically. Incorporating foreground elements, such as trees or buildings, creates depth and context, making the shot more dynamic. Shoot during different phases to capture varied silhouettes and textures. Adjusting the angle enhances perspective, adding uniqueness to each photograph. Experimenting with different compositions can lead to astonishing results, showcasing individual creativity.
Post-Processing Your Photos
Post-processing plays a crucial role in elevating moon images taken with an iPhone. It enhances details and adds artistic flair, transforming photos from good to exceptional.
Editing Apps for iPhone
Many editing apps can streamline the process of enhancing moon photos. Popular choices include Lightroom, Snapseed, and VSCO. These apps offer powerful tools for adjusting exposure, contrast, and saturation. Lightroom allows users to refine highlights and shadows, while Snapseed provides a user-friendly interface for selective adjustments. VSCO’s presets can add a unique touch with various filters. Users should explore these options based on their preferences and desired results.
Enhancing Your Moon Images
Enhancing moon images involves several techniques that elevate quality. Adjusting brightness and contrast can highlight lunar features. Reducing noise through designated tools ensures clarity in low-light conditions. Additionally, cropping can improve composition, focusing attention on the moon. Applying clarity and sharpness adjustments reveals intricate details on the lunar surface. Experimenting with color temperature can bring warmth or coolness, depending on the desired effect. Each enhancement contributes to a polished final image that captures the majesty of the moon effectively.
Capturing the moon with an iPhone can transform ordinary nights into extraordinary photographic experiences. By applying the techniques discussed readers can elevate their skills and impress others with stunning lunar images.
Utilizing the right settings and equipment plays a crucial role in achieving clarity and detail. With a little practice and creativity anyone can showcase their unique vision of the night sky.
Post-processing further enhances these images making them stand out even more. As they explore the beauty of moon photography they’ll discover a rewarding hobby that connects them to the wonders of the universe.